Create a soft and adorable ferret pillow to decorate your home with this crochet pattern, perfect to add a touch of critter whimsy to any room!

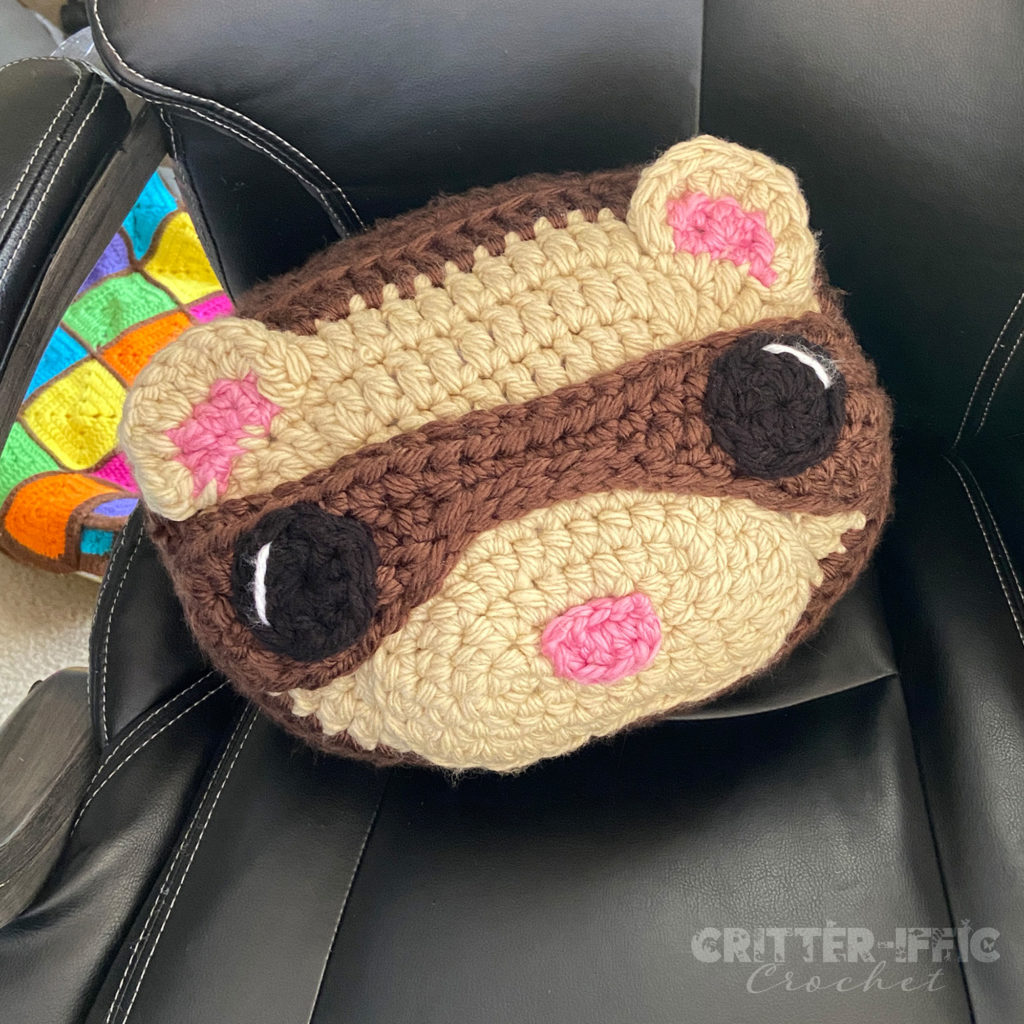
With this pattern you will be able to create the sweetest huggable piece of critter decor! Fidget the ferret pillow pattern is made using double stranded super bulky yarn and works up quickly!
Yarn needed
Super Bulky Yarn (6)
I used Lion Brand Hometown USA but any weight 6 yarn will work!
• 325 yards main color
• 100 yards accent color (This is the color that will be used for the face)
• 20 yards Pink
• 20 yards Black
• about 1 yard white for eyes
Other Materials needed
• 10mm crochet hook, I use Clover Amour Crochet Hooks
• Stuffing
• Yarn needle, stitch marks and scissors.
Gauge
6 Dc Sts across and 3 Dc rows = 4″.
• Finished pillow is approx 14” wide 10” high and 5” thick when made with above yarn and hook.
Stitch Key
• Ch: Chain
• Sl St: Slip Stitch
• St (s): Stitch(es)
• Sc: Single Crochet
• Sc Inc: Place 2 Sc Sts into the same St to increase by 1
• Sc Dec: Sc the next 2 Sts together to decrease by 1
• Hdc: Half Double Crochet
• Hdc Inc: Place 2 Hdc Sts into the same St to increase by 1
• Hdc Dec: Hdc the next 2 Sts together to decrease by 1
• Dc: Double Crochet
• Dc Inc: Place 2 Dc Sts into the same St to increase by 1
• Dc Dec: Dc the next 2 Sts together to decrease by 1
• Sk: Skip St
• Yo: Yarn Over
• FLO: Work following Sts into the front loops only
• BLO: Work following Sts into the back loops only
• MR: Magic Ring
• []: Repeat the Sts between these as many times as stated after.
• (): Place all Sts within these into the the same St
• FO: Fasten off with a Sl St to the first St made or use the invisible join method
How to read this pattern
Example: Round 4: [Sc, Sc Inc, Sc] x 6. (24)
What that means: Single crochet into the next St, then place 2 Single crochet into the next stitch to increase, and Single crochet into the next stitch. Repeat this set of instructions within the [ ] 6 times around, ending with a count of 24 stitches total in round 4.
Front Half
• Holding two strands of your accent color yarn
• Worked in the round, around a starting Ch
• Ch x 11
Round 1: Dc into 2nd Ch from the hook, Dc x 8, (Dc x 5) into the last Ch. Rotate to work along other side of the chain (do not turn over). Dc x 8, (Dc x 4) into the last St. (26)
Round 2: Dc Inc, Dc x 8, [Dc Inc] x 5, Dc x 8, [Dc Inc] x 4. (36)
Round 3: Dc Inc, Dc x 9, [Dc Inc, Dc] x 5, Dc x 8, [Dc Inc, Dc] x 4. (46)
Round 4: Dc Inc, Dc x 10, [Dc Inc, Dc x 2] x 5, Dc x 8, [Dc Inc, Dc x 2] x 4. (56)
Round 5: Dc, change to main color, and Dc into same St, Dc x 11, [Dc Inc, Dc x 3] x 5, Dc x 8, [Dc Inc, Dc x 3] x 4. (66)
• Fasten off accent color
• Dc x 3, Hdc, Sc, Sl St. (6) These stitches are here only to shift the starting point of the following rounds. The first St in round 6 is the one that will be marked.
Round 6: BLO: Ch x 2, Hdc x 66. (66)
Round 7: Dc x 64, Hdc, Sc. (66)
• Sl St to 1st Dc to close.
• FO, weave in end.
Back Half of ferret pillow
• Holding two strands of your main color yarn
• Worked in the round, around a starting Ch
• Ch x 11
Round 1: Dc into 2nd Ch from the hook, Dc x 8, (Dc x 5) into the last Ch. Rotate to work along other side of the chain (do not turn over). Dc x 8, (Dc x 4) into the last St. (26)
Round 2: Dc Inc, Dc x 8, [Dc Inc] x 5, Dc x 8, [Dc Inc] x 4. (36)
Round 3: Dc Inc, Dc x 9, [Dc Inc, Dc] x 5, Dc x 8, [Dc Inc, Dc] x 4. (46)
Round 4: Dc Inc, Dc x 10, [Dc Inc, Dc x 2] x 5, Dc x 8, [Dc Inc, Dc x 2] x 4. (56)
Round 5: Dc, change to main color, and Dc into same St, Dc x 11, [Dc Inc, Dc x 3] x 5, Dc x 8, [Dc Inc, Dc x 3] x 4. (66)
• Fasten off accent color
• Dc x 3, Hdc, Sc, Sl St. (6) These stitches are here only to shift the starting point of the following rounds. The first St in round 6 is the one that will be marked.
Round 6: BLO: Ch x 2, Hdc x 66. (66)
Round 7: Dc x 64, Hdc, Sc. (66)
• Sl St to 1st Dc to close.
• FO, leave long tail.
• Using tail and your yarn needle, whip stitch the two halves together, stuffing to your desired firmness before closing completely.
Snout
• Holding two strands of your accent color yarn
• Worked in the round, around a starting Ch
• Ch x 8
Round 1: Hdc into 2nd Ch from the hook, Hdc x 5, (Hdc x 3) into the last Ch. Rotate to work along other side of the chain (do not turn over). Hdc x 5, Hdc Inc into the last St. (16)
Round 2: Hdc Inc, Hdc x 5, [Hdc Inc] x 3, Hdc x 5, [Hdc Inc] x 2. (22)
Round 3: Hdc Inc, Hdc x 6, [Hdc Inc, Hdc] x 3, Hdc x 5, [Hdc Inc, Hdc] x 2. (28)
Round 4: Hdc x 15, (Hdc, Dc), Dc Inc x 2, (Dc, Hdc), Sc, Sl St, Sc, (Hdc, Dc), Dc Inc x 2, (Dc, Hdc), Hdc. (35)
• FO, leave long tail
• Sew snout to the bottom front center of the face with the shaped edge facing down and the 15 Hdc at the top. *optional* Stuff lightly if desired.
Face Mask
• Holding two strands of your main color yarn
• Worked in a row
• Ch x 25
Row 1: Hdc into 2nd Ch from the hook, Hdc x 23, Ch x 1, turn. (24)
Row 2: Hdc Inc, Dc x 7, Hdc, Sc x 6, Hdc, Dc x 7, Hdc Inc, Ch x 1, turn. (26)
Row 3: Hdc, Dc x 8, Hdc, Sl St x 6, Hdc, Dc x 8, Hdc, Ch x 1, turn. (26)
Row 4: Sk 1st St, Hdc, Dc x 4, Hdc, Sc, Sl St x 10, Sc, Hdc, Dc x 4, Hdc, Sl St. (25)
• FO, leave long tail.
• Sew to center of face with row 3 pointing down and hugging the top of the snout.
Nose
• Holding two strands of your pink yarn
• Worked in the round, around a starting Ch
• Ch x 4
Round 1: Hdc into 2nd Ch from the hook, Hdc, (Hdc x 3) into last Ch. Rotate to work along other side of the chain (do not turn over), Hdc, Hdc Inc. (8)
• FO, leave long tail and sew to center of the snout.
Eye (make 2)
• Holding two strands of your black yarn
• Worked in the round
Round 1: Dc x 10 into a MR, Sl St to first St to close. (10)
• FO, leave long tail and sew onto each side of face mask.
• With a single strand of your white yarn, stitch an accent flare into each eye.
Ears (make 2)
• Holding two strands of your pink yarn
• Worked in rows
• Ch x 4
Row 1: Hdc Inc into 2nd Ch from the hook, Dc Inc, Hdc Inc (change to accent color on the last Hdc), Ch x 1 and turn. (6)
Row 2: Hdc Inc, (Hdc, Dc), Dc Inc x 2, (Dc, Hdc), Hdc Inc. (12)
• FO, leave long tail.
• Sew an ear to each side of the face, angled outward and just above the face mask.
I hope you have enjoyed creating my Fidget the ferret pillow pattern! Once you make one, send it to me so I can share it in the community gallery!
Leave a Reply
You must be logged in to post a comment.